
Recently I came across a write up on Lumitec Lighting's SeaBlaze 3 LED lights that was pretty decent. And I had seen them in displays at the big West Marine up in Old Saybrook and liked the construction and heft of the lights. Very reasonably priced. On top of that they're US designed AND manufactured. Bonus!
So anyway, I decided to give them a try. Since Sonny IV is currently sitting on the hard, awaiting a rebuilt engine (you'll have to wait for that story!) I decided to go ahead and install a pair. I choose their SeaBlaze 3 Blue/white light. I went with this one because the white should work well when we're in clearer waters such as BI and LIS in the cooler months, and the blue is said to penetrate our normal murkier waters. You cycle through the colors, white, blue, both, by just flicking them off and back on quickly.
For spacing I decide to measure for 4 lights, but to just install two for now. That way I can increase the brightness if I think it's needed, but keep my costs down for now. And by measuring for all 4 now I can be sure everything will be spaced out properly.
At home I'm a measure twice, cut once kind of guy. On the boat it's measure 4 or 5 times, then think about it, then check again! I wanted to make sure I'd have no issues with stringers, wires, hoses, etc. I found that for me, setting the two first lights (I did the inner pair) at 22" apart on the centerline would work well and let me mount the outer pair an additional 22" from each of those. The lights will be ~9" underwater at normal trim.
Once the measuring and marking was all done the installation was very simple. The lights need a 1/2 center hole for the wire and then 3 small perimeter holes for the mounting screws. So I drilled a small pilot hole and made sure it was where I expected. I drilled out the center hole, and then used the fixture as a template for the mounting screw holes. The lights come with plastic insulators so that the stainless screws don't react with the aluminum body, and I used those to center a bit and make the initial marks for the (smaller) holes for the #10 screws.
Here's the port side mount location:
And here's the bit in the sleeve. I taped the bit so it wouldn't cut the plastic. Also, this bit is too large for the #10 screws, so the tape helps make sure I didn't go too deep! Just through the gelcoat.
A little more work and I had both sides ready to go:
Since the lamps are aluminum they're not supposed to be covered or touching non-aluminum safe bottom paint. Plus I wanted the 4200 to adhere well to the hull, so I sanded down to bare glass.
Then smear on a bunch of 4200. I put some on the center hole, which is a snug fit, a large donut of it around the center post, and some at each screw location.
Then you just tighten down the screws until 4200 comes out all around the edges. One it's cured I'll give the screws a final quarter turn and I should be good to launch.
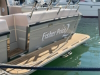
Here's the finished product:
Hoping to do the wiring tomorrow. And of course, we'll just have to wait a while for the in water test.